M1 MacOS
These are instructions to support installation of the Bitfount package on Macs running an M1 chip. For older Mac machines running on Intel chips, see Intel MacOS.
Several packages that Bitfount depends on do not yet have extensive support for the M1. In particular, NumPy can be quite challenging to get set up. For this reason, we recommend configuring a version of Homebrew for installing Intel-based versions of all dependency libraries.
Terminal and brew setup
In order to interpret Intel-based versions of libraries, you will need to make use of Rosetta. Rosetta is software developed by Apple that enables a Mac with Apple silicon to use apps built for a Mac with an Intel processor. It works automatically in the background whenever you use an app built only for Mac computers with an Intel processor. It translates the app for use with Apple silicon.
The sequence of steps for installation of relevant version of brew is:
- Install Rosetta
- Set up your terminal to use Rosetta
- Install Intel and M1 versions of brew
The individual steps are explained below.
Installing Rosetta
Rosetta does not come pre-installed on Mac and we have to explicitly install it. You can install it using the default Mac terminal.
/usr/sbin/softwareupdate --install-rosettaUsing Rosetta with the default Mac Terminal
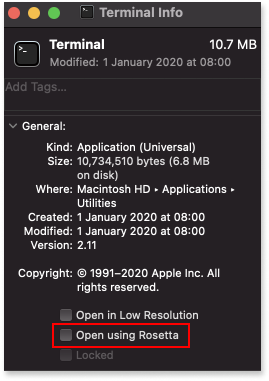
Go to Applications, make a copy of Terminal in Applications, rename it and set it up to run under Rosetta by right clicking on the application and click on ‘Get Info’. Tick the checkbox that says ‘Open using Rosetta’. You only need to do this once.
Using Rosetta within iTerm
If you prefer to use iTerm instead of the default Mac Terminal, once iTerm is downloaded and installed, right click on the application in Finder and select ‘Get Info’. Tick the checkbox that says ‘Open using Rosetta’ — This ensures everything works fine with the Apple Silicon (M1 chip). You only need to do this once.
Installing both M1 and Intel versions of brew
Now, install Homebrew for M1:
/bin/bash -c "$(curl -fsSL https://raw.githubusercontent.com/Homebrew/install/HEAD/install.sh)"then also install it for Intel by running:
arch -x86_64 /bin/bash -c "$(curl -fsSL https://raw.githubusercontent.com/Homebrew/install/master/install.sh)"Then, you can make aliases for both the M1 and Intel Homebrew (e.g. mbrew and ibrew respectively). This can be done as follows by adding the following two lines to the .zshrc file in your root directory:
alias ibrew='arch -x86_64 /usr/local/bin/brew'alias mbrew='arch -arm64e /opt/homebrew/bin/brew'Installing Python
You should use Python 3.8 or 3.9. In order to do this. Once your chosen Rosetta terminal (Terminal or iTerm) is installed or configured, use either the iTerm Rosetta (brew) or the alias for the Intel Homebrew (ibrew) to install python and its dependencies as follows:
brew
brew install lapackbrew install cmakebrew install openblascurl https://raw.githubusercontent.com/Homebrew/homebrew-core/fb8323f2b170bd4ae97e1bac9bf3e2983af3fdb0/Formula/libomp.rb -o libomp.rbbrew unlink libompbrew install libomp.rbbrew install opensslbrew install python@3.8ibrew
ibrew install lapackibrew install cmakeibrew install openblascurl https://raw.githubusercontent.com/Homebrew/homebrew-core/fb8323f2b170bd4ae97e1bac9bf3e2983af3fdb0/Formula/libomp.rb -o libomp.rbibrew unlink libompibrew install libomp.rbibrew install opensslibrew install python@3.8Also, make sure that pip is installed. (You can check this by running pip help). If not, use the below command to install:
python3 -m ensurepip --upgradeIf you receive an error, we recommend trying again after entering a virtual environment by running source <venv_path>/bin/activate
Note: Even though it might seem easier to run brew/ibrew install libomp, version 12.0.0 of libomp on Homebrew is incompatible with LightGBM on MacOS, hence we need to install an earlier version.
As recommended by Homebrew, the following variables should also be set in the .zshrc file in your root directory:
export PATH="/usr/local/opt/python@3.8/bin:$PATH"export LDFLAGS="-L/usr/local/opt/lapack/lib -L/usr/local/opt/openblas/lib -L/usr/local/opt/python@3.8/lib"export CPPFLAGS="-I/usr/local/opt/lapack/include -I/usr/local/opt/openblas/include"export PKG_CONFIG_PATH="/usr/local/opt/lapack/lib/pkgconfig:/usr/local/opt/openblas/lib/pkgconfig:/usr/local/opt/python@3.8/lib/pkgconfig"Bitfount Installation
Once the python and libomp dependencies are installed you should be able to install bitfount using the package manager pip.
We recommend that you install bitfount in a virtual environment. You should first install virtualenv as follows:
pip install virtualenvAnd then create and activate a virtual environment:
python -m venv <path_to_virtual_environment>source <path_to_virtual_environment>/bin/activateEither in the virtual environment or on your local machine you can then proceed to install bitfount.
pip install bitfountThis might take a few moments, so do not worry if so — grab a coffee or tea while you wait!
If you are planning on using the bitfount package with Jupyter Notebooks we recommend you install the splinter package bitfount[tutorials] which will make sure you are running compatible Jupyter dependencies.
pip install "bitfount[tutorials]"Next Steps
Once you’ve installed Bitfount, whichever party that will provide the data for analysis must connect the data to a Pod. See For Data Custodians for detailed instructions.
If data is already connected to a Pod for analysis and you wish to train models on or query it, see For Data Scientists.